
Setting up SPF + DK + DKIM with Postfix in Plesk 11.5 on Debian Wheezy


Shows up a detailed process on how to set up SPF + DK + DKIM with Postfix in Plesk 11.5 on Debian Wheezy, step by step, and how to test to make sure everything is working correctly
I leased a dedicated server from Hetzner, and I got the Plesk option, for administration, so I don’t have to bother with administration, but turns out I’m not so lucky, I’ve ran into a lot of issues with using Plesk, so I had to do my own fixes.
So let’s take a look at how we can integrate SPF + DK + DKIM with Postfix in Plesk 11.5 on Debian Wheezy.
First things, first, if you are using QMail switch to Postfix, to install Postfix you can either use the GUI, or you can do it from a console.
Here is how to do it from the console.
/usr/local/psa/admin/sbin/autoinstaller --select-release-current --install-component postfix
SPF
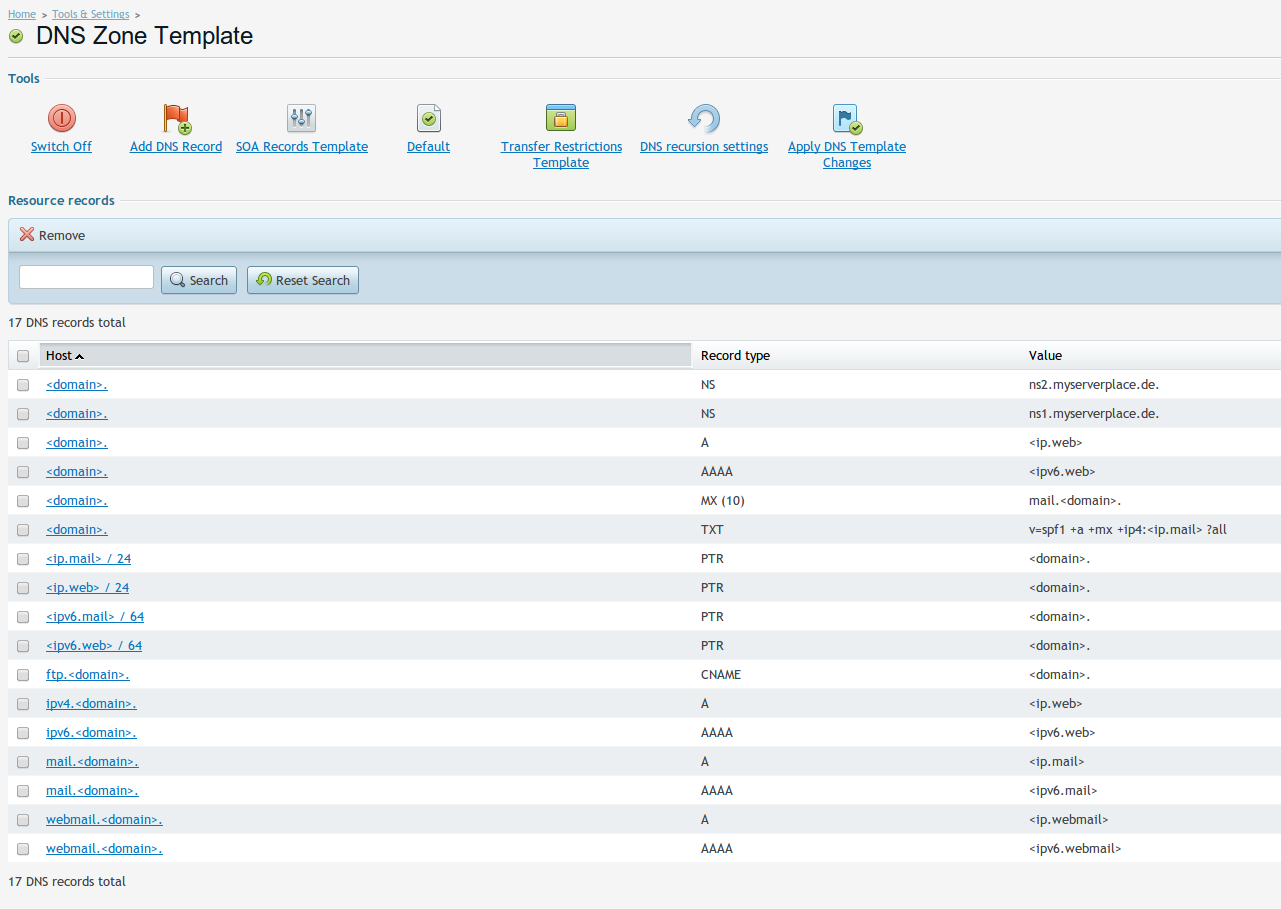
Let’s open the DNS Template, you will see there that, there is an entry for SPF
v=spf1 +a +mx -all
This means the SPF is enabled on our domain.
Let’s modify it a little bit to be better, if you are gonna host multiple domains from your server, then you should probably modify it too.
v=spf1 +a +mx +ip4:<ip.mail> ?all
<ip.mail>- Is the IP of the mail server that is responsible for sending the mails, it is automatically filled in when you apply the zones
After you do this modification you should apply it
So now my configuration looks like this:
Now let’s check with dig if the SPF is OK.
dig myserverplace.de TXT @ns1.myserverplace.de
You will see in the Answer section I have the following entry
myserverplace.de. 600 IN TXT "v=spf1 +a +mx +ip4:144.76.163.46 ?all"
So everything is ok, next onto DomainKeys
DomainKeys
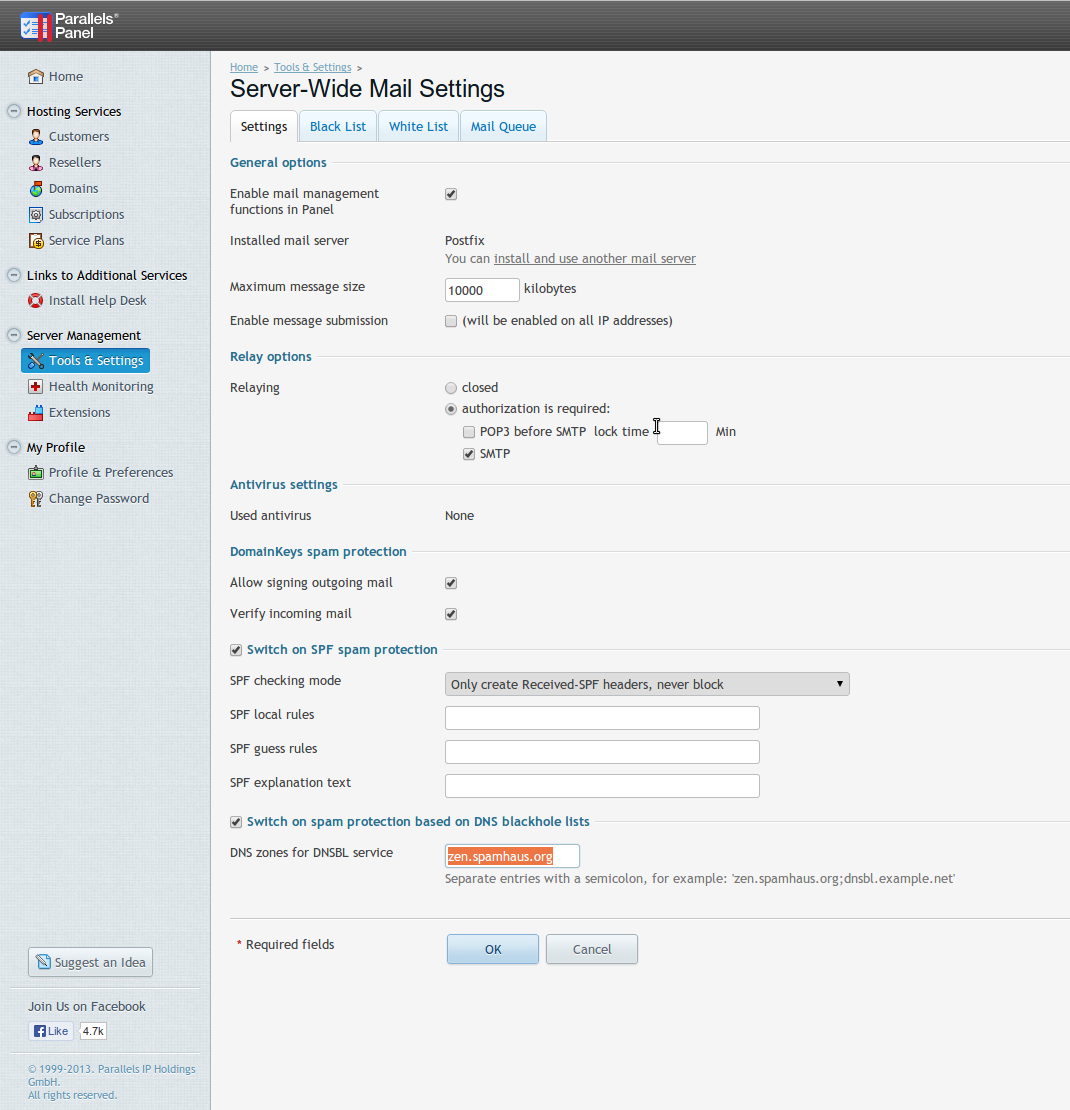
First let’s activate DomainKeys, take a look at the screenshot, and compare my options with yours.
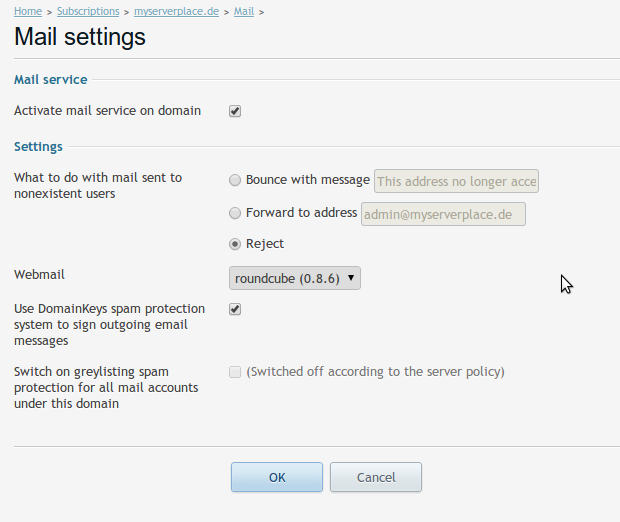
Ok, now that this has been enabled, let’s go and enable for the domain in question, if it was already checked, uncheck it press OK, and then check it again and press OK, this is so it will regenerate the DomainKeys data in the DNS zone, as I’ve had some problems with the data not present in the DNS zone file
OK, now let’s see if the correct data is there, usually it takes a long time for DNS to propagate between 24-48h, there is a simple way to test if the data is there, by querying the Nameserver that hosts your DNS zone, in my case I host my own Nameserver
dig _domainkey.myserverplace.de TXT @ns1.myserverplace.de
You will see in the Answer section I have the following entry
_domainkey.myserverplace.de. 600 IN TXT "o=-"
Now let’s see if the DomainKey is there too
dig default._domainkey.myserverplace.de TXT @ns1.myserverplace.de
In the Answer section you should see something like
default._domainkey.myserverplace.de. 600 IN TXT "p=MIGfMA0GCSqGSIb3DQEBAQUAA4GNADCBiQKBgQDAruBNqdsSCKBLwMrFNNKH8z0e7zmlAic7iRoJsDDJK3IlnW8j6G/T6a93m+jqYc6R38MBAZbeSv2LQJ0SepJEsr4Iqk41WFXPBKnyXReO1RXPW5/YnRe6dpJMEqsmPpl2TjInY7ve/6VCiVDOHn9RRrdB+x7CGeK2crgqSZVlFwIDAQAB\;"
As you can see everything is in place now for DomainKeys to work, now let’s continue on to DKIM
DKIM (DomainKeys Identified Mail)
As always lets update the system first
aptitude update
aptitude safe-upgrade
Now we need to install the DKIM filter, or as it’s called now OpenDKIM, for full specification take a look at their site.
aptitude install opendkim opendkim-tools
Now we need to create the necessary folders so OpenDKIM can work proplery
mkdir -pv /etc/opendkim/keys
chown -Rv opendkim:opendkim /etc/opendkim
chmod go-rwx /etc/opendkim/*
This will create the directory where we will hold the keys for OpenDKIM, after this step let’s take a look at how the process will look like, so we can create a script to automate this.
mkdir -p /etc/opendkim/keys/myserverplace.de
cd /etc/opendkim/keys/myserverplace.de
opendkim-genkey -d myserverplace.de -s mail
chown -Rv opendkim:opendkim /etc/opendkim/keys/myserverplace.de
chmod -v u=rw,go-rwx *
This easily understandble, what happens here.
Now you have two files /etc/opendkim/keys/myserverplace.de
ls -lah /etc/opendkim/keys/myserverplace.de
total 16K
drwxr-xr-x 2 opendkim opendkim 4.0K Oct  9 18:43 .
drwxr-xr-x 5 opendkim opendkim 4.0K Oct  9 19:39 ..
-rw------- 1 opendkim opendkim  887 Oct  9 18:43 mail.private
-rw------- 1 opendkim opendkim  303 Oct  9 18:43 mail.txt
- /etc/opendkim/keys/myserverplace.de/mail.private
contains the RSA PRIVATE KEY
- /etc/opendkim/keys/myserverplace.de/mail.txt
Contains the record you need to add to your DNS zone
Next set is to setup the key tables, signing tables, and trusted hosts
First let’s prepare the files
touch /etc/opendkim/KeyTable
touch /etc/opendkim/SigningTable
touch /etc/opendkim/TrustedHosts
/etc/opendkim/TrustedHosts
needs to contain some data before we continue, so add the following information to this file, and adjust accordingly
127.0.0.1
localhost
144.76.163.46
144.76.163.57
ns1.myserverplace.de
ns2.myserverplace.de
myserverplace.de
So let’s see what does what:
- /etc/opendkim/KeyTable
KeyID Domain:Selector:PathToPrivateKey
- /etc/opendkim/SigningTable
The filter used is programmed to read the table by looking for matched domain
- /etc/opendkim/TrustedHosts
It will list the top trusted hosts as you desire
Those three files contain all the necessary information for the signing to work.
So in my case for my domain I do.
echo "myserverplace.de myserverplace.de:mail:/etc/opendkim/keys/myserverplace.de/mail.private" >> /etc/opendkim/KeyTable
echo "*@myserverplace.de myserverplace.de" >> /etc/opendkim/SigningTable
echo "myserverplace.de" >> /etc/opendkim/TrustedHosts
echo "mail.myserverplace.de" >> /etc/opendkim/TrustedHosts
So let’s put all this together in a script so we don’t have to do it all the time
#!/bin/bash
# /opt/generatedkim.sh
die () {
    echo >&2 "$@"
    exit 1
}

[ "$#" -eq 1 ] || die "1 argument required, $# provided, domain required, ex: ./script example.com"

cwd=`pwd`
opendkim="/etc/opendkim"
location="$opendkim/keys/$1"
[ -d "$location" ] && die "There is already a directory in the folder, delete the folder if you want to create a new one"

mkdir -p "$location"
cd "$location"
opendkim-genkey -d $1 -s mail
chown opendkim:opendkim *
chown opendkim:opendkim "$location"
chmod u=rw,go-rwx *
echo "$1 $1:mail:$location/mail.private" >> "$opendkim/KeyTable"
echo "*@$1 $1" >> "$opendkim/SigningTable"
echo "$1" >> "$opendkim/TrustedHosts"
echo "mail.$1" >> "$opendkim/TrustedHosts"
echo
echo "Put this in the DNS ZONE for domain: $1"
echo
cat "$location/mail.txt"
echo
cd "$cwd"
So if we run the script, we should get output like this, and this is the data we need to put in the DNS zone.
/opt/generatedkim.sh test.de

Put this in the DNS ZONE for domain: test.de

mail._domainkey IN TXT "v=DKIM1; k=rsa; p=MIGfMA0GCSqGSIb3DQEBAQUAA4GNADCBiQKBgQDPzE0GmvFwAQsgcFzopy4zMNWUbL6JM5XIyjBy3bUnANI5axeb/Lw/GBjUoSFLEiO80Tt8m3A5YrBKcodRQQURYiW6/YtElhLupHyfcxQhfNLU4z9JUOJKPjcpMZCj0Xv873QgVOl+7U605JdBHSPOx4ybBZwDq68cw9YFYRPmEwIDAQAB" ; ----- DKIM key mail for test.de
Unfortunatly I don’t have time to create a script to do this automatically, you can always insert a record in MySQL database so it’s in the ZONE and you can regenerate the DNS Zone from the command line, and I won’t be having a lot of domains, so I can add this entry manually to a domain I want DKIM enabled
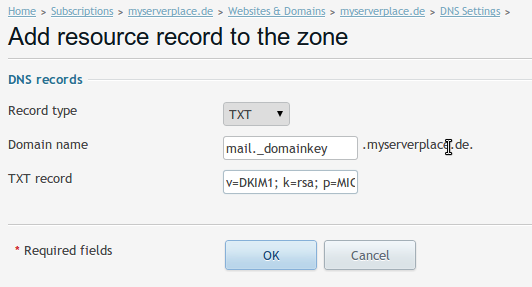
Let’s open the domain and go to DNS Settings, and you can click ** Add Resource **
You popuplate the following data in the inputboxes
- Record type
TXT
- Domain name
mail._domainkey
- TXT Record
In the text record you copy a part of the contents from the file /etc/opendkim/keys/myserverplace.de/mail.txt, it data should start from v=DKIM1; k=rsa; to the end, without the quotes as you can see it’s in quotes.
In the example above for domain test.de you add only the following contents in the input box
v=DKIM1; k=rsa; p=MIGfMA0GCSqGSIb3DQEBAQUAA4GNADCBiQKBgQDPzE0GmvFwAQsgcFzopy4zMNWUbL6JM5XIyjBy3bUnANI5axeb/Lw/GBjUoSFLEiO80Tt8m3A5YrBKcodRQQURYiW6/YtElhLupHyfcxQhfNLU4z9JUOJKPjcpMZCj0Xv873QgVOl+7U605JdBHSPOx4ybBZwDq68cw9YFYRPmEwIDAQAB
Well that’s it for this, now let’s check with dig if the record is there
dig mail._domainkey.myserverplace.de TXT @ns1.myserverplace.de
You will see in the Answer section I have the following entry
mail._domainkey.myserverplace.de. 600 IN TXT "v=DKIM1\; k=rsa\; p=MIGfMA0GCSqGSIb3DQEBAQUAA4GNADCBiQKBgQDMziMcgPTWK0kSUKxrgHHzEiWxNkZ2/M0Ugyr/8H9WtoCsJUM+Bc1C9VwqJ6yjTidecDrX7aL0lFZ9Mylku/wtSiPw6KLxMg2LG2vrMzlPTB2lmJNmg/EOu3KPC8BtAuOhXfwVH/ttQbzdKJKWqiCJn7jhF5oqEKnOCORxOQXKIwIDAQAB"
Well everything is setup up at least from the DNS side, now we need to configure Postfix to use this data and sign the emails.
You can also use the following URLs to check the validity of your key
In the selector fields try with both mail, and default, you shold be getting valid results
OpenDKIM
We need to edit the configuration file to configure DKIM, open /etc/opendkim.conf with your favorite editor and add the following lines to the end of the file
# Enable Logging
Syslog yes
SyslogSuccess yes
LogWhy yes

# User mask
UMask 002

# Always oversign From (sign using actual From and a null From to prevent malicious signatures header fields (From and/or others) between the signer and the verifier)
OversignHeaders From

# Our KeyTable and SigningTable
KeyTable refile:/etc/opendkim/KeyTable
SigningTable refile:/etc/opendkim/SigningTable

# Trusted Hosts
ExternalIgnoreList /etc/opendkim/TrustedHosts
InternalHosts /etc/opendkim/TrustedHosts

# Hashing Algorithm
SignatureAlgorithm rsa-sha256

# Auto restart when the failure occurs. CAUTION: This may cause a tight fork loops
AutoRestart Yes

# Set the user and group to opendkim user
UserID opendkim:opendkim

# Specify the working socket
Socket inet:8891@localhost
That’s it for OpenDKIM, now we should restart the service
service opendkim restart
Postfix
Now let’s see what we need to do to configure Postfix to use OpenDKIM.
Execute the following command to see the milters configured
cat /etc/postfix/main.cf | grep "milters"
smtpd_milters = , inet:127.0.0.1:12768
non_smtpd_milters = , inet:127.0.0.1:12768
You can see that we have additional milters we need to put, this one is from the process psa-pc-remote, and it’s part of Plesk
Open /etc/postfix/main.cf with your favorite editor, and add the following to the end of the file
# OpenDKIM
milter_default_action = accept
milter_protocol = 6
smtpd_milters = , inet:127.0.0.1:8891, inet:127.0.0.1:12768
non_smtpd_milters = $smtpd_milters
As you can see we added the OpenDKIM milter too, and milter_protocol is set to 6, this is important, if it’s not set to 6, the psa-pc-remote process will segfault like so,
psa-pc-remote[18523]: segfault at 0 ip 00007fa5be18c034 sp 00007fa5bccffd30 error 4 in libc-2.13.so[7fa5be123000+180000]
And your messages won’t be signed with DomainKey, only with DKIM
service postfix restart
Testing
There is an easy way to test if everything is correct, create an email account if you haven’t already and send a test mail to the following recepients, and the results are cut down because the text is too big
==========================================================
Summary of Results
==========================================================
SPF check:          pass
DomainKeys check:   pass
DKIM check:         pass
Sender-ID check:    pass
SpamAssassin check: ham
============================================================
SPF result: Pass
============================================================
Domain: myserverplace.de
IP: 144.76.163.46

SPF Record: myserverplace.de
        IN TXT = "v=spf1 +a +mx 144.76.163.46 ?all"

============================================================
DomainKey result: pass
============================================================
Signed by: [email protected]

PublicKey: default._domainkey.myserverplace.de
        IN TXT = "p=MIGfMA0GCSqGSIb3DQEBAQUAA4GNADCBiQKBgQDAruBNqdsSCKBLwMrFNNKH8z0e7zmlAic7iRoJsDDJK3IlnW8j6G/T6a93m+jqYc6R38MBAZbeSv2LQJ0SepJEsr4Iqk41WFXPBKnyXReO1RXPW5/YnRe6dpJMEqsmPpl2TjInY7ve/6VCiVDOHn9RRrdB+x7CGeK2crgqSZVlFwIDAQAB;"

============================================================
DKIM result: pass
============================================================
Signed by: [email protected]
Expected Body Hash: frcCV1k9oG9oKj3dpUqdJg1PxRT2RSN/XKdLCPjaYaY=

PublicKey: mail._domainkey.myserverplace.de
        IN TXT = "v=DKIM1; k=rsa; p=MIGfMA0GCSqGSIb3DQEBAQUAA4GNADCBiQKBgQDMziMcgPTWK0kSUKxrgHHzEiWxNkZ2/M0Ugyr/8H9WtoCsJUM+Bc1C9VwqJ6yjTidecDrX7aL0lFZ9Mylku/wtSiPw6KLxMg2LG2vrMzlPTB2lmJNmg/EOu3KPC8BtAuOhXfwVH/ttQbzdKJKWqiCJn7jhF5oqEKnOCORxOQXKIwIDAQAB;"
Logs
You can check the following locations to see if there are errors
- /var/log/mail.err
- /var/log/mail.warn
- /var/log/mail.info
- /var/log/syslog
Note
Make sure you enable testing mode for DKIM if you plan to test, you can also cut down the EXPIRY time so the results propagate faster, so to enable testing mode set the key _domainkey to t=y; o=-